|
Hunting Information |
 |
|
Home Of Anglers and Hunters |
 |
|
Hunting Information |
|
|
Home Of Anglers and Hunters |
|
![]()
![]()
![]()
![]()
![]()
FIREARM INFORMATION IN CANADA
F.A.C. (Firearms Course Information) for anyone that is preparing for the test or course.
For more Information about the Test
On-line Downloading For A Fire Arms Licenses
http://www.cfc-cafc.gc.ca/info
OR
Click On This Underlined Address "NOW"
Telephone: 1 800 731-4000 (toll-free)
phone # 1-780-495-7799
Fax: (613) 957-7325
E-mail: cfc-cafc@cfc-cafc.gc.ca ![]()
If you need "More Help" With Firearms-Click On This Link
Firearm(s) Band 2020 By Goverment ???
LIST
The following nine (9) types of firearms and their variants are now prohibited:
M16, AR-10,
AR-15 rifles and M4 carbine
Ruger Mini-14 rifle
M14 rifle
Vz58 rifle
Robinson Armament XCR rifle
CZ Scorpion EVO 3 carbine and pistol
Beretta CX4 Storm carbine
SIG Sauer SIG MCX and SIG Sauer SIG MPX carbine and pistol
Swiss Arms Classic Green and Four Seasons series (as specified in former Bill C-71)
Upper receivers of M16, AR-10, AR-15 and M4 pattern firearms are also now prohibited devices.
Also now prohibited are firearms with the following characteristics:
capable of discharging a projectile with a muzzle energy greater than 10,000 Joules
a bore of 20 mm or greater
10,000 Joules = ???
10,000 Joules to Foot-pounds Force = 7375.6215
WOW
How Many Hunters or Anyone Know This Crap?
Contact Your Friends and Family Now
1 Foot-Pound Force:
Exactly g x 1 lb x 1 ft. Approximately 1.3558179483314004 Joules (SI).
The amount of energy it takes to push with 1 pound-force for a distance of 1 foot.
Unit Descriptions
1 Joule (SI unit):
1 J = 1 m*N = 1 kg*m2/s2
1 Joules to Foot-pounds Force = 0.7376
Muzzle Energy
Muzzle Energy is the Kinetic Energy of a Bullet as it is expelled from
the muzzle of a firearm. Without consideration of factors such as aerodynamics
and gravity for the sake of comparison, muzzle energy is used as a rough indication of the destructive potential of a given firearm or cartridge.
The heavier the bullet and especially the faster it moves, the higher its muzzle energy and the more damage it will do.
Goverment Website is: Firearms Click Firearms with Cursor
For Information Bringing A Rifle, Shotgun, or Handgun into Canada
__________________________________________________________________
SPORTSMAN OF THE YEAR
Hunter Of The Year

~Mr. John Teeter~
Thank you for your Hospitality and Your Great Hunting Ethics!
"And Becoming A Great Friend"
Safe Hunting..............Good Luck
________________________________________________________
Safari Club Trophy Winner
Gary Jamieson
#1 Whitetail-Typical
1999

Congratulations Gary
__________________________________________________
A Method To Anneal Your Rifle Shells
Annealing Custom Cartridge Cases
You don’t need magic to make parent cases last longer—you just need to know how to heat-treat brass the right way.
The crayon mark from a 650 degree F. or 660degree F. temperature- crayon melts or changes color when the case neck and shoulder reach a rated heat for close temperature control.
Many performance-oriented shooters think they can designbetter cartridges than currently available products, but they’re never able to
convert their ideas into metal. However, modifying or converting one case into another custom case—the easiest way to create a custom cartridge case—is
usually simple.
Even moderately complex conversions consist of simple changes you can make easily. Conversions are complex when you have to do a number of things to each case, then repeat each operation on every case in a good supply. Each step takes time, even if you do it sloppily. Care takes more time, but shortcuts cost more than they save.
You don’t need any magic wand or potion to turn a parent case into a custom case, but you need to know which steps and techniques should’t be overlooked in the process. One of these must-do steps is annealing, or heat-treating, parent brass. Annealing brass makes it tougher and stronger, which gives you more life out of your hand loaded cases.
Here’s a rundown of the basics of annealing and how you can incorporatethe process into your hand loads.
Annealing
What It Is?
Forget Cinderella and her fairy godmother. An old gal
who could turn mice into horses and a pumpkin into a coach could turn a bushel of spent .22 Long Rifle cases into .600 Nitros in her sleep. But they would
all split at midnight, probably because she didn't’t anneal the brass.
Annealing is nothing more than heat-treating a portion of the case and letting it cool. This process prevents the metal from being brittle. Omitting or deciding against annealing can be a costly shortcut. You may never have to anneal a case, but if you do, it’s easy. A cartridge designer once gave me a short, necked case he’d formed from a longer rifle case. He had not annealed it before he necked it down. The new neck was the upper part of what had been the body of the original cartridge. He had trimmed away the original neck and at least part of the shoulder. He may have loaded and fired it but not more than once; he may have resized it once more. But before he got around to loading it again, the entire neck split in several places and peeled back in curled strips. He’d put a lot of work into shortening, necking, and reaming expensive cases. In neglecting to anneal them, he’d shortened their useful life to just one loading.
Unfortunately, many who modify cartridge cases both fear and ignore annealing, and others either hurry it too much or overdo it. Short case life, sometimes even canceled case life, is the result of both misunderstandings of how important annealing can be and how to anneal the appropriate portions of cases properly. Annealing leaves the neck, the bullet-gripping portion of the case, soft enough to be cold-worked several times—by firing, then by resizing, again and again—but another annealing may become necessary later. Knowing when to anneal and how to do it marks the expert former of custom cases.
Annealing Fine Points
Case necks sometimes need to be annealed again, to extend their useful life after a long succession of firings and resizing have work-hardened
them. When case necks start to split, the rest of that batch of cases may need to be annealed again.
Case necks, shoulders, and sometimes their upper bodies often have to be annealed before the case gets drastically modified. One drastic case modification that requires annealing is familiar to most wildcatters—necking the case up or down by more than one caliber step or by more than one die will re-form it —necking the .30-06 down to smaller than .270 or .280 or up to larger than 8mm, for example.
Another drastic modification is re-forming the case body to smaller or larger diameters (swaging a case with a nearly cylindrical body, a shoulder, and a neck down to a long taper, for one example) or blowing a tapered case out to a nearly cylindrical shape.
Remember, cases come annealed enough to accommodate the moderateup-down working of repeated firings and resizing Below the neck, on the shoulder and upper body, the softness from annealing fades gradually to the hardness range of the lower body and base.
The farther down the case it’s necessary to reshape it, the more it needs further annealing. Shortening a case so drastically that part of the shoulder or the upper body becomes the new case neck always requires annealing to make the originally harder shoulder or upper body soft enough to be a good case neck. If this shortening of the case also includes necking the old shoulder or upper body radically up or down, annealing that portion of the case becomes more critical to long case life and good performance.
Extra work ing of the neck, from either the small but repeated reworking in a lot of firing and shooting or the single drastic renecking to a larger or smaller caliber, hardens the brass and shortens the working life of the case. Annealing gives a tired case a new start, if you don’t wait too long to do it.
Neck Annealing is often advisable, if not necessary, whenever you form a case neck to another caliber, as Hand loaders of most wildcat cartridges know. But we often form cases for one factory cartridge into the shape of another factory cartridge to make a custom case. This re-forming cold-works the brass, making it harder and more brittle. Annealing softens the neck, to offset the cold-working and to retain the resilience of softer brass. If the neck is to stay the same, but the body is to be blown out, annealing usually it is not’t necessary unless the expansion of the body is radical.
The body, once you’You Have expanded it, does not’t have to be expanded again. But the neck gets worked up and down with every firing and resizing. The expanded body is not’t stretched tightover anything, either. But the neck of a loaded case is stretched tight over a bullet. It’s under a stress that does not’t affect the hardness of the brass in the shoulder or the body.
You can re-form new brass that’s never been sized or loaded, without having to anneal it (the factory annealing is enough), if forming it to the new shape does not’t work the neck (or neck and shoulder)drastically, or you’re re-forming only the annealed area of the case (the neck, or the neck and shoulder).
Brass that ’s been loaded and fired again and again, has sat around for years, or has been passed along from one hand loader to another probably ought to be annealed before it’s re-formed for use as a different cartridge.
How To Anneal
Proper annealing seems
so ticklish, some hand loading experts flatly advise against it. But they’re
usually not wildcatters, so they get along with factory brass and see annealing
only as a means of restoring resiliency to the necks of tired cases. Also, too
much of what has long been printed about annealing has sired a family of false
ideas that have led hand loaders to ruin a lot of good brass by too much or
too little annealing. Buying new ready-formed brass is not’t always a
practical option, even for some well-known factory cartridges. It’s almost
never an option for the fellow who loads wildcat or obsolete cartridges.
So, despite some otherwise worthy advice, the need for annealing can be inevitable if the brass is to be fit for hand loading. Over annealing is a double danger. Only the neck, shoulder, and upper body can be safely annealed at all. The rest of the case must retain its original hardness. The head in particular has to be hard, which is why the manufacture of good brass requires enough draws to work-harden the head. The head (especially) can’t be safely softened, so the annealing absolutely must be confined to the other end, a process that’s ticklish enough with a case as long as the .30-06 and immeasurably trickier with most handgun cases and very short rifle cases. Any annealing of the head is too much.
But the neck is easy to over anneal, too. Get it too hot, which makes it too soft, and it’s too weak to grip the bullet as tightly as it should.
If you plan to anneal by the old slap-dash, lick-and-a-promise methods that rely on heating the brass to the right shade of blue, practice first on ruined and junk cases before you try to anneal any you don’t want to ruin. Use cases with mouth cracks, enlarged primer pockets, incipient or partial head separations, or Berdan primers if you don’t want to load them, or those oddball cases you picked up here and there and never planned to load anyway. Pick up occasional cases for cartridges you don’t shoot, when other shooters leave them behind. Clean and polish them so you can see when the brass changes color with the steep heat you’re going to turn on them. Killing the polish with too much heat tells you have gotten the case too hot.
But there’s a much better method.
Quick,uniform, consistent application of high heat is the key to good annealing. When the brass around the mouth reaches a temperature of about 660 to 665 degrees Fahrenheit, its surface becomes light blue. This is as hot as you want to let it get. If you let the color run too far toward the other end of the case, you can ruin the head by making it too soft. If you let the color on the neck go beyond light blue, and the shine disappears, you’re on the edge of ruining the case, and you may already have gone too far. If you let the case get red, it’s a goner.
But depending on getting the color just right is too loose and iffy to suit me. I prefer and recommend relying on something more dependable than personal color perception. The most reliable case thermometer I know is a 650 or 660 degree temperature-sensitive crayon called a temp stick.
The hot, small flame of a torch is the only heat source you can rely on to give you the quick, local heat you need for selectively annealing the neck without heat-softening the base. High heat brings the neck and shoulder up to annealing temperature quickly, while the base end is still safely cooler; lower heat lets the base end get too hot while the neck and shoulder are getting just hot enough. Therefore, safe neck annealing takes high heat and a surprisingly short time.
Temperature-sensing crayons allow close temperature control. Any well stocked welding supplier has them or knows where to get them. McMaster-Carr stocks two kinds, and I hope a few hand loader suppliers like Huntington’s will stock them if there’s enough demand for them. The mark made by one kind of crayon melts at the rated temperature, plus or minus one degree. The other kind leaves a yellow mark that changes to red-brown at the rated temperature and tolerance.
The 650-degree crayon, which melts at about 10 to 15 degrees below annealing temperature. These pellets are for other applications and are not’t adaptable to case annealing. The 660-degree crayon changes color at approximately the correct annealing temperature (within 2 degrees or so).
Which crayon is better? For annealing only a short area such as just the neck and not much lower on the case, the 660-degree color-change crayon is probably better. When the color changes a bit lower down, the upper neck should be just about the right amount hotter. Annealing a longer area means there’s a wider range of temperatures between the mouth of the case and the lower edge of the annealing area. The 650-degree melting crayon allows a range of about 10 to 15 degrees Fahrenheit. You could use this crayon to mark the lower edge of the area to be annealed, or the other crayon to mark the upper portion of the annealing area.
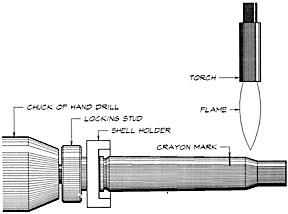
The Jig
The simple, convenient annealing system
I favor uses the threaded locking stud and appropriate shell holder from a Lee case trimmer to grip the
base of the case, both for twirling the case in the tip of the flame and for absorbing anyheat that may reach the base of the case while.
If Your Annealing the other end. I like to have at least a handle on the shaft of the Lee case trimmer’s locking stud, but no handle is really necessary.
An old-fashioned hand drill is just the ticket for twirling a case in the tip of a flame, or you can chuck the locking stud in an electric screwdriver.
I thread the shell holder onto the stud, insert a crayon-marked case in the shell holder, tighten the stud into the shell.
An alternative method is to thread a bronze-bristle bore-scrubber brush of the same caliber as the case neck (or slightly larger) into a section of a
jointed cleaning rod or directly into a wood (preferably) or plastic handle. Or chuck it in a hand drill or electric screwdriver.
Thrust the brush into the neck of the case you’have polished and marked with the appropriate temp-sensor crayon. When the polished brass is the right shade of blue, the crayon mark will melt or change color in response to the heat. Shove the case immediately into cold water, pull the case off the brush, and set it aside to dry. Or drop it into the water if it still feels hot.
Don’t use the mouth-support method (the brush) if you can set yourself up to use the base-support method (the Lee shell holder), especially if you’re annealing a long section of a short case. Two extreme cases leap to mind —annealing the .32 Auto case before forming it to the .22 Flea, and annealing the .45 Auto case before forming it to Bo Clerke’s superb .38-.45 Auto. For either of these and for a host of others less critical, the only safely workable method is one that absorbs as much as possible of the heat that reaches the base before the annealing area gets hot enough.
If you use the brush and have only a plastic handle for it, be sure to cool the brush thoroughly with each case you quench, or heat buildup will melt the plastic. The older RCBS wooden handle was far superior to the prettier plastic handles now current. If you anneal a lot of cases, especially if you anneal them far below the shoulder, get a wooden file handle from Brownells and adapt it to hold your bronze brushes.
By Ken Howell via the internet
Thank-you for your Information to us all.
Another Way To Anneal Your Brass Using Heat And Salt!!!
By
http's://ballisticrecreations.ca
![]()
![]()
Just Click On This Active Link
_______________________________________________________
.264 Winchester Information............. Click Here
![]()
![]()

.264 Winchester Magnum by Geno
________________________
Using The Sako Quad Rifle
Watch This Movie Using CCI Ammo
in
.22 Winchester Magnum
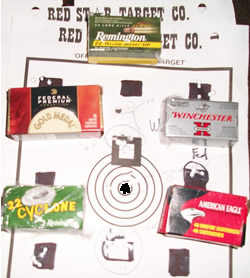
This has to be One of the Best Rim fire Rifles I Have Had The Opportunity to Own.
I have now shot the .22 Winchester Magnum Sako Quad Set Up
That performs Spectacular.
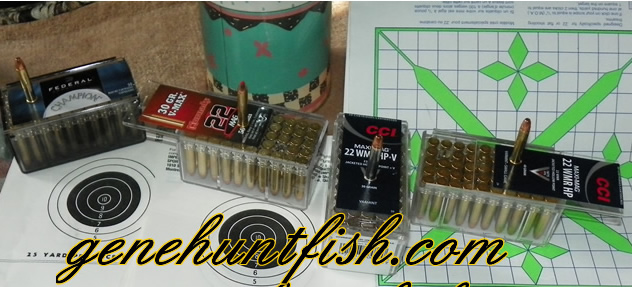
Shooting Several different ammunition.
Nikon Scope, and All Of My Targets were more then anyone can imagine.
I was shooting at 50 yards to set up my scope, to shoot from 50 to 150 yards.
And, The Damage The .22 Winchester Magnum is, A,.............. Awesome Caliber To Shoot.
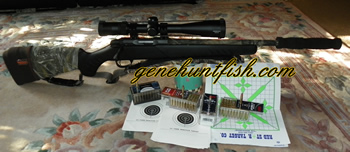
All ammo I shot using my Sako Quad Set up, were all Excellent. Depending what you want to use
this caliber for. You will have over 12 companies and Loaded Ammo to buy at your local gun shop.
I adjusted the TRIGGER!!
And Now The Rifle Is My Favorite to SHOOT!!!!
 ________________________________________________________________
What Is The Best .22 Rifle Scope To Buy
I just spent the last few months shooting Several Rifle Scopes trying to really
get some really good accuracy without Burning My Eyes out shooting
All Day Long.
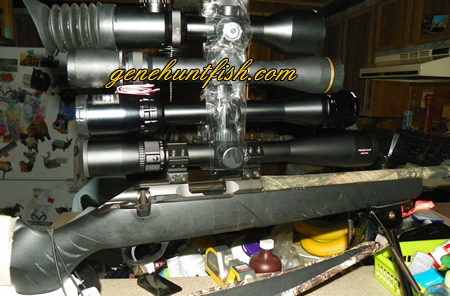
The Scopes I Used
1) Leupold 2.5 by 8
2)Bushnell 3.5 by 10 with fine adjustment dial at different ranges
3)Barska 3 by 9 Multi Color Crosshairs
4)Nikon 3.5 by 10 Rimfire
5)Nikon 4.5 by 16 Buck Master
6)BSA Multi Color Color Dots
And When It Was All Said and Done, The BSA Was My Favorite Choice To Shoot.
I shot from 25 to 100 yards away on my Herter's Shooting Bench.
________________________________________________
Click On This Underlined Link to Order Yours

Starting Price $3.50 and up
Hottest Lure In Town.............. Click Here To Order
Professional Guide and Master Angler
G.W.(Gene) Lopushinsky
______________________________________________
E-Mail Me At: info@genehuntfish.com
![]() Copyright © 2001-2024 genehuntfish.com...............
Copyright © 2001-2024 genehuntfish.com...............![]() All
Rights Reserved.
All
Rights Reserved. ![]()

Owned and Operated by (GW) Gene Lopushinsky.
